Is the Page Size and Bleed correct?
Remember to check that you have set your page size to match the product that you are ordering. Most products generally have 1.5mm bleed on each edge, but there are some exceptions such as Booklets for example. Some products may have special sizes or bleed requirements. Files supplied without bleed will be scaled up to create the required bleed, which may result in printed elements appearing closer to the edge than expected. Please note that we do not require crop marks or printers marks.
Download an InDesign template to start your design from.
Have you checked your Artwork Orientation?
Always choose a template appropriate to the orientation of your design; it’s best to have text reading ‘upright’ on screen. If it’s not possible to design the text ‘upright’ (maybe, you need a landscape front and a portrait reverse), then you must ensure the generated artwork’s front and reverse are oriented as you need. (We impose Right to Left, place pages side by side to check the orientation of your document and view our examples here).
Have you observed a Quiet or safe zone?
The quiet or safe zone may vary depending on the product ordered, you’ll need to check that you don’t have any important elements in this area. For most of our products we ask that all important elements are 4mm away from the cut edge, or 5.5mm away from the page edge. Elements within this area may appear closer to the edge than expected when guillotined and often result in an uneven looking design.
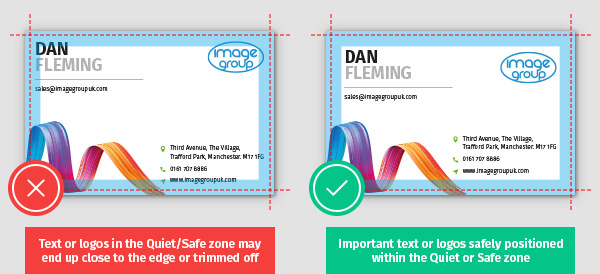
Designed margins
The use of designed margins or uniform borders near the product edge is strongly discouraged because guillotine cutting is not accurate enough to ensure that margins will be of the same width on every edge. Even a 0.5 mm movement in the guillotine blade will make the margin look uneven. Our guillotine tolerances are ± 1 mm for Litho Products and ±2 mm for Digital and Large Format.
Have you used the correct colour mode?
When saving your file, ensure that you have set the artwork up in the correct colour mode for the product that you are ordering. Most products are produced in CMYK process colour. If RGB or LAB colours are found they will be converted to CMYK which will result in some colour shift. We do not recommend supplying files in RGB or LAB as it's unlikely they'll print as expected. Pantone Colours will also be converted to CMYK (where applicable) with the same results.
An example of an image supplied in RGB The same image once converted to CMYK

Colour Tolerances/Variation
Unfortunately, colour variation is inherent in any print process and an exact colour match cannot always be guaranteed. The example below will give you an idea of how your chosen colour may actually look when printed. It's worth bearing this in mind when placing orders for multiple sets of business cards and reorders as colour variation affects each printed job and can also vary throughout a print run; due to air temperature, humidity and many other factors outside of our control.
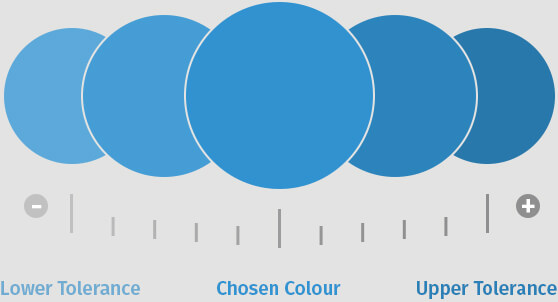
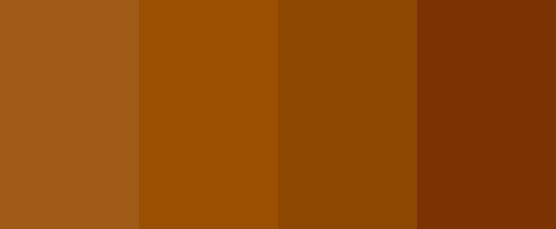
Colours made up of 2 or more CMYK colour channels increase the amount of variation you can expect to receive.
Example: 1 CMYK colour channel (Cyan)

Example: 3 CMYK colour channels (Magenta, Yellow & Black)
Have you checked your ink levels?
Make sure all colours are below a 300% total ink coverage for coated papers and 225% for uncoated. Lower limits apply to some papers, take a look at our full guidelines for recommended ink levels.
Avoid Set-off, Misregistration and Banding
The rule of thumb:
• Avoid using more than one colour channel for Black Text (100% K only reduces the likelihood of misregistration, which results from aligning multiple plates with fine details).
• Use a Rich Black (100% Black (K) and 40% Cyan OR 100% Black (K) and 40% Magenta) for areas over 2cm squared in size to avoid banding as single colour blacks can appear washed out when printed across large areas.
• Avoid using Colours with combined ink limit of 225% for Uncoated Stocks and 300% for Coated Stocks to reduce the likelihood of set-off, which is when ink transfers from one side to the other during guillotining.
Cracking / Chipping
When paper is folded, its interlinking fibres are compressed on one side and stretched on the other. If the outer fibres lose their hold on each other, we see this as 'cracking': an opening out of the paper on the outside. This will be more visually apparent where the design includes a dark colour across the fold. If dark colours are required please upgrade to a Laminated Product which will help to reduce the appearance of cracking. This affects any product that is creased or folded such as Folded Leaflets, Creased / Shaped Flyers and Presentation Folders.
'Chipping' occurs when small chips / nicks appear in the print along the trim edge. This will be more noticeable when solid / darker colours are used and bled right to the edge of the design. To help reduce visible chipping, we recommend upgrading to a Laminated Product such as Laminated Business Cards / Flyers / Presentation Folders.
However, please bear in mind that recycled and uncoated stocks are more brittle and thus more prone to both cracking and chipping than our coated stocks.
Check your image resolution?
Remember to check the requirements for the resolution of images, as it may vary for different products. For CMYK process printing, your colour images should be set to 300dpi @ 100% size.
Correct number of pages?
Ensure that you supply us with the correct number of pages in your file. You can supply your pages as individual PDFs or as a multiple page PDF. Page 1 should be supplied as the front design, page 2 the reverse and finishing on page 3 where appropriate.
File saved in the correct format?
Remember to check that you are saving your file in the correct format for the product that you are ordering. We would prefer you to supply us with a 'Press Quality' PDF (Compatability: Acrobat 5 (PDF Version 1.4) or later). Take a look at out full list of accepted formats.
Need Help?
If you would like some more information or advice when setting up your graphic files, take a look at our detailed File Supply Guide or get in touch on sales@imagegroupuk.com, call us on 0800 389 9898 or click on the chat widget at the bottom left of the website to be instantly connected to the central support team.