Booklet Templates
Download the appropriate InDesign Template to start your design from.
If you have any questions then it’s best to call us before you start work – it may save you some headaches later on.
TL:DR
- Design as single pages
- 3mm bleed on each page edge
- 10mm 'Quiet zone'
- Avoid design elements that cross the spine
- Avoid using borders in your design
Booklet sizes
| Booklet finished size |
Artwork size (portrait) |
Artwork size (landscape) |
| A3 |
297 mm × 420 mm |
303 mm × 426 mm |
— |
| A4 |
210 mm × 297 mm |
216 mm × 303 mm |
303 mm × 216 mm |
| A5 |
148 mm × 210 mm |
154 mm × 216 mm |
216 mm × 154 mm |
| Square |
210 mm × 210 mm |
216 mm × 216 mm |
— |
| Wide |
244 mm × 210 mm |
— |
244 mm × 216 mm |
| 1/3rd A4 |
99 mm × 210 mm |
105 mm × 216 mm |
— |
| A6 |
105 mm × 148 mm |
111 mm × 154 mm |
— |
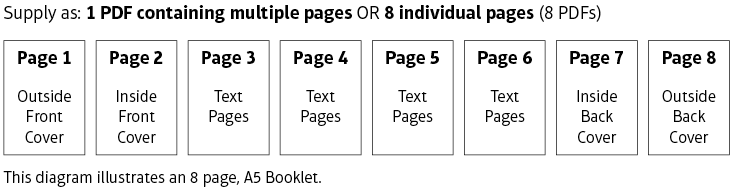
Design as single pages
Create a separate page in your artwork for each page of your Booklet. You can supply as a multi-page document or as one document per page.
Please don’t supply as “printer’s pairs” or spreads.
Add 3mm bleed to each side
Booklets need more bleed than other products. Look at the finished page size of the Booklet. Add 3mm to all sides of your page – a total of 6mm across each axis. You even need to add bleed to the edge which forms the spine. Our process chops this off and merges the spine together.
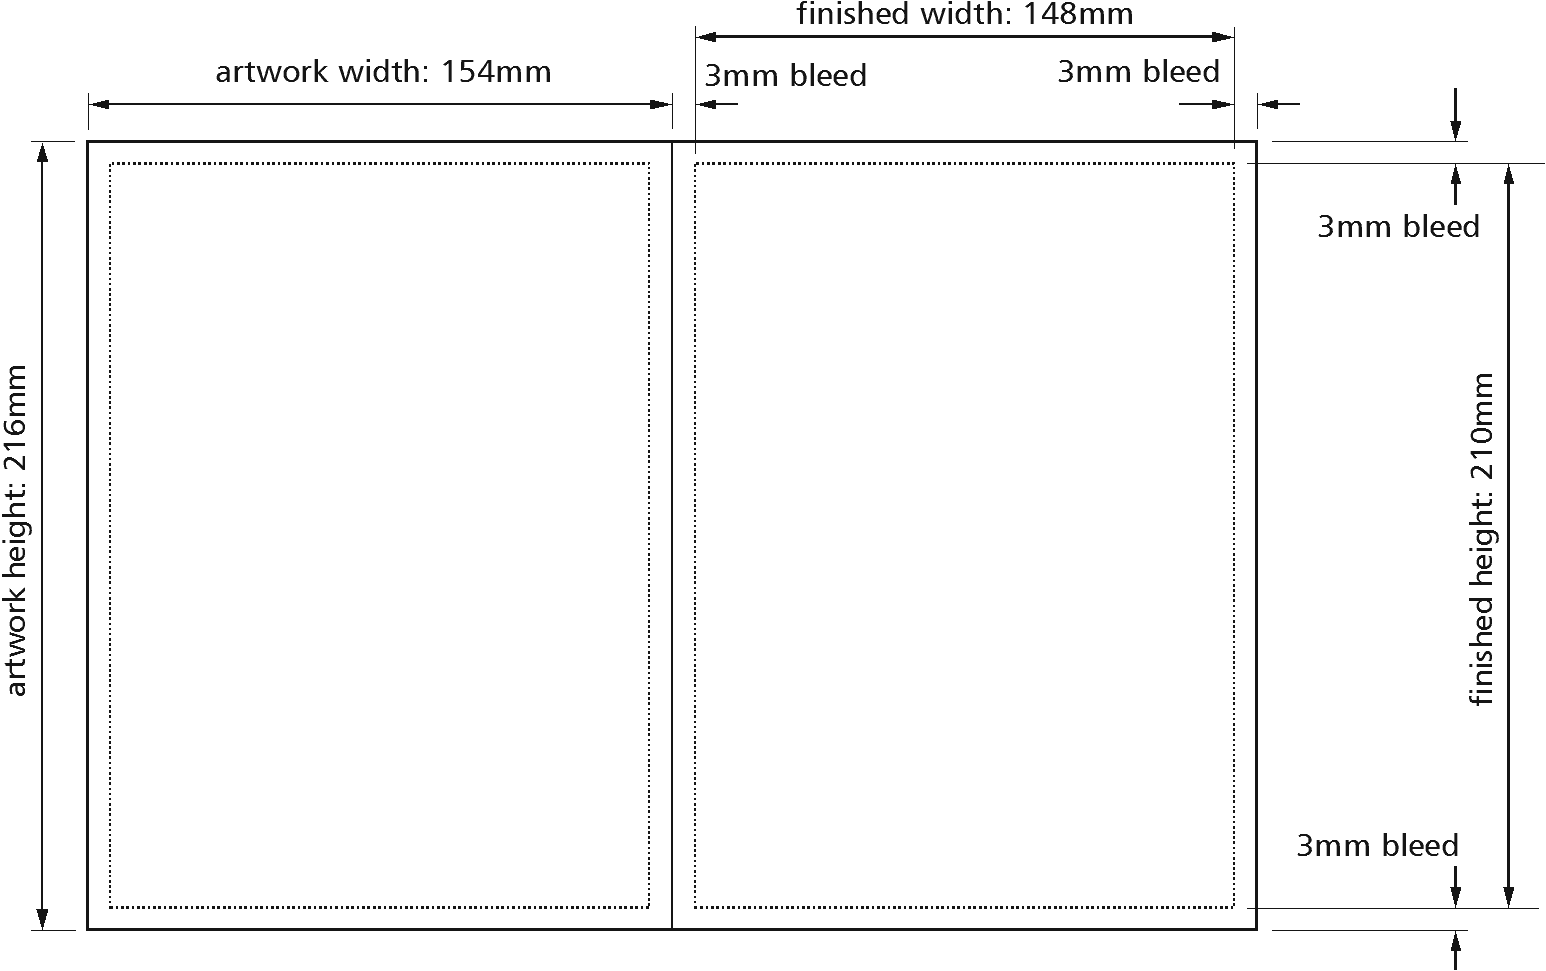
Two pages. Note that they are separate pages, arranged as a spread.
The dotted line shown here (not an artwork item) indicates the finished size of the booklet.
Consistent orientation
Each template has a specific orientation, either landscape or portrait. Don’t change this.
If you want to supply landscape pages on a portrait booklet, just rotate the content of the pages yourself so they fit in the orientation required by the product specification (For example, the back page should be rotated clockwise and the front page and all other pages rotated anti-clockwise). While doing this, pay careful attention to the imposition. Make a mock-up to be safe.
Avoid objects which cross pages
It’s unlikely that objects which cross pages will line up exactly. It’s best to avoid them or accept that there will be some vertical movement throughout your Booklet. You’ll also need to allow for the bleed being trimmed off – ask us if you’re not sure.
If you must have elements that cross the spine, make sure your artwork follows our guidelines for making it work.
Don’t use borders; they’ll look terrible.
.png)
Colours
Avoid trying to match colours throughout the booklet. Some colour variation is inherent in the process and will be most noticeable where two pages of the same colour meet. If you’re ordering a booklet with a thicker cover then it is unlikely that colours crossing from the outer cover to the inner pages will match perfectly due to the different finishes of papers and card types.
Allow for creep
In a stapled Booklet the bulk of the paper causes the inner pages to extend (creep) further out than the outer pages when folded.  When trimmed the inner pages are narrower than the outer pages. The amount of creep is dependent on the number of pages and paper thickness. The thicker the Booklet, the more you need to keep important objects away from the edges.
Mind your margins
Normally, we recommend that you keep important objects at least 4mm from the ‘trim’ size. As a result of creep, we’d advise you to increase your margin to avoid anything being chopped off – larger quiet areas are definitely better. When we design Booklets ourselves, we tend to leave at least 10mm of ‘Quiet Zone’ or ‘safe space’ on the trimmed edge. This means that creep isn’t as noticeable and items won’t be chopped off. If your booklet is thicker than 20 pages, we recommend adding 1mm to the quiet zone for each extra 8 pages.
Other booklets
If you are designing a booklet with a folder for a cover, please call us to discuss this as we can give you a special template and specific advice on setting the files up ready for us to produce.
Are you producing your booklet from our Digital Range? If so please read the extra information on our How To supply files for our digital range, as the process for those is different.

 Print this page